


Table of Contents:
A Displaced Load Zone, or DLZ, is a method for activating certain triggers (particularly loading transitions) from a distance, subject to certain conditions. This allows access to several areas early, leading to major skips within all Unrestricted runs.
Two general notes:
In order to activate a DLZ, any party member must be placed in a very precise position. There are two main conditions:
Under these conditions, the DLZ will occur and the trigger will activate. The first condition is fairly simple, but dependent on the layout of each individual module; some modules have multiple useful DLZs, while others do not have any. The second condition can be extremely difficult, and understanding why requires an understanding of how KotOR tracks party member position.
A party member’s position is kept in three coordinates: x, y, and z. Each of the coordinates is not updated continuously; rather, it is updated on every frame. Thus, even when moving slowly in a constant direction, certain values of each coordinate are skipped over in the time between frames.
In order for the second DLZ condition to be met, the x-coordinate must match at machine precision; that is, the bits storing the x-coordinate must contain the same values as the bits for the position of the trigger you want to activate. Thus even the small gaps in the position values between frames are enough to sometimes skip over the desired x-coordinate.
The execution of all DLZs boil down to three main things:
Oftentimes, you’ll have to move back and forth past the visual cue several times before the DLZ will trigger.
There are two broad things that can be done to improve the consistency of DLZs: move as slowly as possible, and increase the frame rate as much as possible.
To move more slowly:
To increase the frame rate:
For most DLZs, runners will be walking with no movement buffs at a small angle with V-Sync disabled. Tiptoeing and Menu Method can be used to try to enhance consistency if desired, while Stealth Mode is difficult to use in a speedrun, as it requires a stealth belt and points in Stealth skill.
The Menu Method for DLZs uses the Anywhere Menu Glitch to move while a menu is open; having V-Sync off and a menu open greatly increases the game’s frame rate, moreso than disabling V-Sync alone. To perform the Menu Method:
Even using Menu Method, it is still possible to miss the DLZ. The downside to Menu Method is you cannot see your movement, and thus cannot always tell if you have gone past the required x-coordinate. Because of this, most runners do not use Menu Method; but it is a viable method if you want more consistency or if your hardware doesn’t yield high enough frame rates with just V-Sync off.
DLZs are used extensively in every Unrestricted speedrun. This list contains all DLZs used in speedruns and what they skip. Included are links to sections below with information about each specific DLZ.
Each section below will include the modules the DLZ goes from and to, location(s) and visual cues for the DLZ, valid x-coordinates for the DLZ, and a short video of the DLZ in action.
Planet: Endar Spire
Transition: Command Module to Starboard Section
Valid x-coordinates: 47.0451, 47.8932
Used In: All Unrestricted runs
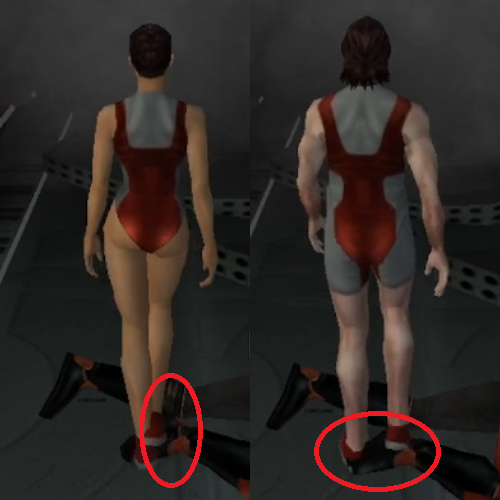
Location 1: Rubble
This is the preferred location for this DLZ, as it can be done without recruiting Trask. However, it is less consistent than the Doorframe location below.
Visual Cues:
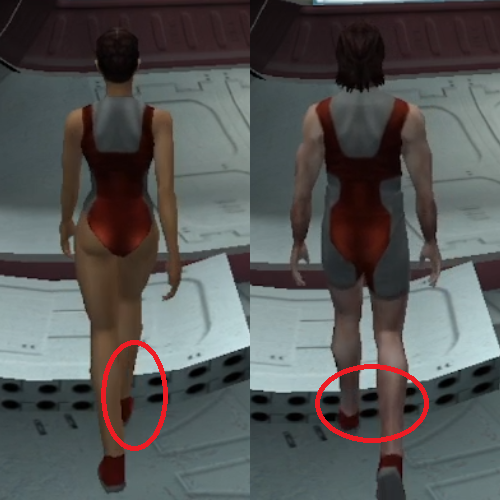
Male: Inside of right leg even with right side of fourth black oval from right
Female: Outside of right leg even with small black line to right of fourth black oval
Video Clip:
Location 2: Doorframe
This location for the DLZ is extremely consistent, to the point where disabling V-Sync is not required. However, as it requires recruiting Trask and killing the first two Sith soldiers, it is 15-20 seconds slower than a good DLZ at the location above.
Location 3: Republic Corpse
This location is at the end of the first hall to the right, near the feet of a Republic soldier’s corpse. While this is technically closer than the rubble location, the visual cues are much worse, and thus this location is not preferred.
Visual Cues:
Male: Right leg centered on corpse’s heel
Female: Right ankle even with left edge of orange patch on corpse leg
Video Clip:
Planet: Taris
Transition: Upper City South to Upper City North
Valid x-coordinates: 183.375, 191.625
Used In: All Unrestricted runs
Location 1: Pillar by Medical Droid This location falls on the pillar behind and to the left of ther medical droid. It is quick for Carth to run right up to it. The frame rate here is also particularly good. This would be the fastest location for Any%.
Location 2: The Table This is the most common spot for this DLZ, but it has fallen out of favor. One will typically line up Carth’s left leg with a dark line on the floor, facing towards the kolto tanks.
(Video Pending)
Location 3: Kolto Tank This one has better frames that the table, but the geometry is rather funky, so it isn’t everyone’s favorite.
Planet: Taris
Transition: Upper City North to Taris Sith Base
Valid x-coordinates: 110.087, 114.89
Used In: All Unrestricted runs
Location 1: Exterior Wall
This location is also close to the default spawn, but against a large wall to the right with no monitors. This would be the fastest location for Any%, since it is closest to the Lower City DLZ location when leaving the Sith base. The best visual cues here appear to be HUD based, which varies based on your resolution.
Locations 2 and 3: Median
These two locations are preferred for this DLZ in All Quests runs, as it is adjacent to the default spawn point in Upper City North and close to the Lower City elevator that will be visited next.
The visual cue for the first location with a Male MC is a faint, jagged black line near the base of the wall; this line should be between the MC’s legs slightly to the left of center.
There is another location on the median further to the right and close to the corner, with a white line near the base of the wall serving as a visual cue in the same way as the black line above. This line is easier to see, but the location is slightly further from the spawn point.
Locations 4 and 5: Janice’s Shop
These two locations are both at Janice’s Droid Shop; the first is against the door to the shop, while the second is against a table inside the shop. A prior version of the All Quests route used the table location for the DLZ directly after shopping with Janice, but currently All Quests uses Location 3 above.
Planet: Taris
Transition: Upper City North to Lower City
Valid x-coordinate: 129.723
Used In: Any% only
Location: Guard Rail
This is the only location used for this DLZ; a similar one exists on the opposite side of the walkway, but it is further away and thus not used.
This is not used in All Star Maps or All Quests because both of those runs want the Sith Armor for a glitch on Manaan, whereas Any% skips Manaan completely.
Planet: Taris
Transition: Lower City to Vulkar Base
Valid x-coordinates: -142.589
Used In: All Unrestricted runs
Location: Inside the Door
This unique DLZ involves using a Partial Door Clip to clip into the door to the Vulkar Base. If Solo Mode is active and V-Sync is disabled, performing a Quick Save and then Quick Load resets the party member’s position to be exactly on the x-coordinate required to DLZ the Vulkar Base load zone.
Planet: Taris
Transition: Vulkar Base to Upper Sewers
Valid x-coordinates: soon
Used In: All Quests only
Location: Hallway Corner
This DLZ is used to enter the Upper Sewers more quickly, so that the door behind the rancor can be opened to complete a quest.
Planet: Taris
Transition: Lower City to Bek Base
Valid x-coordinates: 358.99
Used In: All Unrestricted runs
Location 1: Right Hallway Edge
This DLZ only skips a little walking and speaking with the Bek Base Lookout, but it is one of the easiest DLZs to perform. This location is just before Javyar’s Cantina, and has very reliable visual cues:
Location 2: Left Hallway Edge
This location is slightly closer to the Upper City North entrance, but the visual cues are much worse.
Planet: Taris
Transition: Bek Base to Gadon’s Office
Valid x-coordinates: 72.8628
Used In: Any% and All Star Maps
Location: Edge of Doorframe
A DLZ is the fastest way to bypass the locked door between the main Bek Base and the back areas. It can also be done with a GP Warp or the Security FLU, but the DLZ is the fastest method. This location is the left edge of the door leading back to the Lower City; note it can be done with the door open or closed.
There is a similar location at the right edge of the door leading to the main Bek Base, but it is slightly further away.
Planet: Dantooine
Transition: Jedi Enclave to Courtyard
Valid x-coordinates: 78.5672, 85.8131
Used In: All Unrestricted runs
Location 1: Atrium back locations
These locations are likley slightly better than Atrium left as they have a higher frame rate. Though they have been as frequently used.
Location 2: Atrium Left
This location is used in Any% and All Star Maps. It is the closest location to the Ebon Hawk, and those runs move straight here and DLZ immediately.
Location 3: Council Chamber
This location is used in All Quests, which must talk to the Jedi Council and become a Jedi before leaving. This DLZ is used to leave the Enclave while leaving the MC near Zhar so that position is preserved when Hotshotting back later.
Location 4: Atrium Right
This location is currently not used in runs, but is included for completeness.
Planet: Dantooine
Transition: Courtyard to Ruins
Valid x-coordinates: 346.752
Used In: Any% and All Star Maps
Location: Behind the Door
This location is behind the locked door to the ruins, and thus a Party Spawn Door Clip is used (via Fast Lane) to allow Canderous reach this spot.
Planet: Dantooine
Transition: None; Activates Star Map Cutscene
Valid x-coordinates: 156.023
Used In: All Unrestricted runs
Location: Western Door
This location is the western (or righthand) door in the main room. The x-coordinate is actually just past the bounding box for this door, so the usual technique for achieving the correct coordinate involves running into the nearest corner of the doorframe.
The other commonly used technique is to just grind along the surface of that same door, rather than the corner. Both appear to be equally consistent.
Planet: Lehon
Transition: Temple Exterior to Temple Main Floor
Valid x-coordinates: 264.777
Used In: All Unrestricted runs
Location 1: Outer Fence
This is the preferred location for this DLZ, as the visual cue is slightly nicer.
Location 2: Temple Wall
This location was the original one for this DLZ, but the visual cue is slightly worse.
Planet: Lehon
Transition: Temple Main Floor to Temple Summit
Valid x-coordinates: 97.9318
Used In: All Unrestricted runs
Location 1: Entry Doorframe
This position is the generally preferred one, as it is so close to the entry point as to be part of the entryway. The visual cue usually involves lining up the party member’s right hip with the left edge of the doorframe.
Location 2: Massive Doorframe
This position is opposite the above one, and is near the right edge of the doorframe to the Massive Door. This location has generally weaker visual cues than the above one.
Location 3: Wall Mural
This position is around the corner and against a mural at the end of a short hallway. It triggers the DLZ on the opposite edge of the loading zone than the above two. This location is furthest away and thus not preferred.
There are several other known DLZs that just happen to not be useful in the current speedrun routes. Speedrun DLZs and other useful known DLZs can be found here:
These DLZs could be useful for randomizer or bingo. The playlist is organized and mostly populated by Lufex.